

Whether you are a Microsoft Office veteran or just learning to use the software suite, here are ten major things to be aware of when utilizing Word 2016.

Microsoft’s newest version of Word 2016 has brought Office 2016 on the heels of revitalizing the way people work in the cloud with Office 365. There are new and improved features for the new version, but it is understandable if individuals who are used to older versions of Office may have some challenges in finding their favorite familiar features. For others, this version of Office may be their first use of the software suite.
Either way, we have compiled quick lists of things any beginner should know how to do when working with Office 2016 apps. This article will focus on ten things any beginner should be aware of when working in Word 2016:
1. Open a New Document/Existing Document
Open a new document: To open a new document from an existing document window, select File to open the menu; the default selection is always Open:
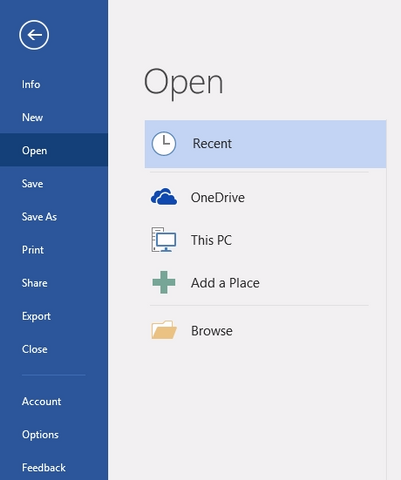
Select New in the blue column, and then choose a document option from the list. Typically, Blank document will be your go-to default style of a document for school, work, or other written tasks. Select your preferred document style to open a new document to work in.
Open an existing document: To open an existing document, select the File menu pictured above and remain in the Open section within the blue column. Depending on where you have previously saved a document, you will be able to search the following listed options to find it:
- Recent - If you have recently opened your desired document, you will likely see it displayed here. If it is visible under Recent, just select it to open the document.
- OneDrive - This links to your Office OneDrive account, a cloud-based storage system in which most Office accounts are granted one terabyte of storage space for personal documents. Be aware that you must be signed into your OneDrive account to access documents here.
- This PC - This option represents the local storage on your device where you can search through your saved files to find your desired document. Word 2016 defaults to your Documents folder, but you can search in other files by just clicking on the arrow pointing up next to the word Documents to go back to your whole list of local files.
- Add a Place - If you have not saved your document on either recently or in your local hard drive, you may add a different place from which to search for your document; this includes Office 365 SharePoint, OneDrive, an external hard drive, or another source you choose to designate.
- Browse - This option is similar to ‘This PC,’ but will instead open a new window and similarly display the same information.
If you ever need to return to your current document, you can select the arrow in the upper left corner of the File menu that points to the left.
2. Saving a Document
The fastest and easiest way to save a document Word 2016 is to select the floppy disk icon in the upper left corner of the screen:
![]()
Another way you can save your document is in the File menu. Select File and then select Save As in the blue column. This menu will provide you with a few options as to where you would like to save your document: OneDrive, This PC, Add a Place, or Browse; the default place to save your document is under ‘Documents’ via This PC. From there, you can enter the name of the file as well as the format before saving. Once you have named your document and chosen a format, select the Save button to the right of the format box to save the document.

*Note: If this is the first time you are saving a new document, selecting either the floppy disk icon or the Save option in the File menu will default to the Save As option.
3. Share a Document
You can share your document with other people who also have Word 2016 or Office 365 in addition to emailing, presenting online, and posting it to a blog. To share your document with other people, you must first save it to your OneDrive account in the cloud; you can do this by saving the document in OneDrive via the Save As menu or selecting the Save to Cloud button under Share with People in Share via the File menu:

Once stored in Word 2016's cloud, you can share the document from within the File menu or use the Share icon on the main toolbar:
![]()
You have a few other options for sharing documents in Word 2016:
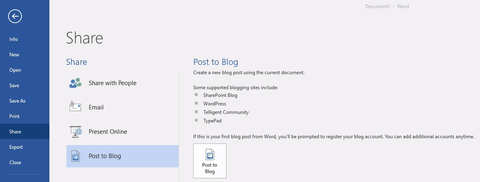
Select File and then select Share. Besides Share with People, you will be able to choose Email, Present Online, or Post to Blog:

You have a few options within the Email menu:
- Send as Attachment - attach to an email message; you must designate an email address
- Send a Link - Send a link to co-workers or team members; as indicated, the document must be saved in a shared location to use the feature
- Send as PDF - send the document in a professional format that cannot be edited or altered by the recipient
- Send as XPS - similar to the PDF format
- Send as Internet Fax - send as a fax to a recipient's machine; requires a fax service provider
- Present Online - you can present the document in a web browser on the Internet; you can also allow viewers to download a copy of the document.

- Post a Blog - publish the document as a blog post on a compatible blogging platform; if you haven’t registered a blog site with Word, you will be prompted to do so before publishing the document.
4. Export
Sometimes when you send out a document, you want to protect it from tampering or accidental edits from recipients or team members. Exporting a document changes its format to either lock it from editing or put it in a form that is compatible with other computers. To export a document in Word 2016, select File and then select Export to find two options:
- Create PDF/XPS Document - As we mentioned before, creating a PDF or XPS file will lock it from being significantly altered by any recipient, but can be filled in with new information. To change your document to a PDF/XPS file in Word 2016, select the Create PDF/XPS button.

- Change File Type - Adjusting your file type format can modify the compatibility of the document for backward compatibility or other platforms. If the file type you want to change to is not listed, choose Save as Another File Type to enter your file type (Note: some file types are not applicable in Word 2016).

5. Create Comments
If you are sharing a document with others through Word 2016, sometimes it is helpful and more efficient to leave notes about the document within the same file instead of sending them in a separate email or message. Word 2016 allows users to leave comments right on the page for everyone involved to see. Comments state a message, who said the message, when the user posted it, and the ability to either reply to the comment or mark it as resolved.
To post a new comment within the document, highlight the keyword/phrase, or place your cursor in the spot you are referencing to make your message easier to understand. Then do the following:
- Select the Comment icon in the upper right corner of the window
![]()
A drop-down menu will appear with the following options: New Comment, Previous, and Next (Previous and Next will be unavailable if this will be your first comment; these commands are meant to navigate quickly through comments if there at least two active comments on the document). Select New Comment and a new comment box will appear on the right side of the document.

Under the name, write your comment and then click outside the box to continue working in the document. If you would like to reply to or resolve a comment, hover over the comment with your cursor to make the ‘Reply’ and ‘Resolve’ buttons active.
If you select ‘Reply,’ your name will appear indented under the original comment and provide you a subject line to type your message.
If you select ‘Resolve,’ you are signifying that the issue the original comment mentioned has been solved, and no longer requires anyone’s attention. The comment will become grayed out and inaccessible. If you wish to reactivate the comment, click on it and select ‘Reopen.’
6. The Home Tab
The Home tab is your default tab when opening a new document in Word 2016, and has some of the most useful tools you will be using when crafting documents. There are five sections on the Home tab ribbon (from left to right): Clipboard, Font, Paragraph, Styles, and Editing. For beginners, we will just focus on the Font and Paragraph sections:
Font
This section gives you tools for manipulating the text in your documents, including size, style, and color.

1. Font - This is the style of the text, ranging from simple standards like “Arial” and “Times New Roman” to fancy styles like “Impact.”
2. Font Size - Determine the size of the lettering in your document using this tool; you may choose a preset size number from the drop-down menu or enter one manually.
3. Increase or Decrease Font Size - By clicking on either the increase or decrease buttons, you can increase or decrease highlighted text or all text in small increments.
4. Change Case - Change text from lower case lettering to upper case, and vice versa. Five different options are available via the drop-down menu:
a. Sentence case - Capitalize the first letter of a sentence
b. lowercase - Change all selected text to lowercase lettering
c. UPPERCASE - Change all selected text to upper case lettering
d. Capitalize Each Word - Make all selected words capitalized
e. tOGGLE cASE - Instantly change lower case lettering to upper case and visa verse
5. Clear All Formatting - Remove any additional formatting including bolding, italics, underlining, color, and hyperlinks; using this tool leaves only the plain text.
6. Bold - Thicken the selected text for better visibility or to signify importance
7. Italics - Put selected text at a slant for emphasis or contextual significance
8. Underline - Add a horizontal line underneath selected text for emphasis or contextual significance
9. Strikethrough - Cross out selected text to demonstrate a change
10. Subscript - Type small text or numbers below typical text line; commonly used for writing chemical compounds
11. Superscript - Type small text or numbers above the regular text line; often used in mathematics such as equations
12. Text Effects and Typography - This option applies different additional effects to selected text such as outlining, shadowing, reflections, glowing, number styles, ligatures, and stylistic sets; not commonly used in most types of documents
13. Text Highlight Color - From here, you can choose to highlight selected text, select a highlight color, or cancel a highlight
14. Font Color - Choose a color for selected text from a drop-down menu; the automatic color default is black
Paragraph
This section gives you different options for formatting your paragraphs, including bullet points, indentations, and line spacing within Word 2016.

1. Bullets - Convert words, phrases, and sentences into a listed format for better visibility; you can choose a bullet style or define a new one from the drop-down menu
2. Numbering - Convert words, phrases, and sentences into a numbered or lettered list format for better visibility; you can choose a style or define a new one from the drop-down menu
3. Multilevel List - If you have a list of items to describe in more detail with multiple sub-points, use this option to craft lists with different levels of depth and complexity easily
4. Increase or Decrease Indent - Set an indentation for the beginning of a paragraph closer to or further from the margin
5. Sort - Quickly organize itemized things in your document alphabetically or numerically
6. Show/Hide ¶ - Select to show or hide paragraph markings such as new paragraphs, indentations, and more
7. Text Alignment - Choose how to align the text in the document in proportion to the margins. The options are Align Left (default, aligns with left margin), Align Center (good for titles, distributed from the center of the page), Align Right (aligns with the right margin), and Justified (text distributed evenly between margins).
8. Line and Paragraph Spacing - Determine how much space exists between lines of text, paragraph breaks, and when starting a new line
9. Shading - Change the color behind selected text, table cell, or the entire text line for emphasis
10. Borders - *For tables only -- Choose to outline part or all of the walls of a selected table cell
7. The Insert Tab
The Insert tab allows you to put extra elements into your Word 2016 document to enhance its look or add new dynamics for conveying information. There are ten sections to this tab, but the average user will only use about half of them for standard documents. The options for the Insert tab are as follows:
- Pages - Add extra pages to your document; you can add a cover page to the front, a blank page within, or add a new page with a page break
- Tables - Create multi-celled tables for organizing information by determining the number of rows (horizontal) and columns (vertical) needed
-
Illustrations - Add images to your document easily by inserting saved images, created shapes, icons, charts, and screenshots:
- Pictures
- Online Pictures
- Shapes
- Icons
- SmartArt
- Chart
- Screenshot - Add-ins - Insert items from additional apps downloaded from the Office Store; additionally, you can quickly find quotes and other information via a quick link search through Wikipedia
- Media - Insert a video from an Internet source
-
Links - Add links to external sources or within your document:
- Hyperlink - Add a link to a website, file, or specific place within your document
- Bookmark - Works in tandem with hyperlinks, serving as a source for a hyperlink within your document; to activate a bookmark, highlight particular text, add bookmark, and then create a hyperlink that directs to the bookmark
- Cross-reference - Similar to a hyperlink within your document, a cross-referencing automatically generates a label for the source you are referencing and can include the name of the source - Comments - Select this option to insert a comment about where you have placed your cursor or any text you have highlighted
- Header & Footer - Click either Header or Footer and choose a style of header or footer respectively to add to your document to add report annotations, company logos, and more; additionally choose a particular place for page numbers for multi-page documents
-
Text - This section allows you to insert advanced text items that can enhance your document or give it a more professional look:
- Text Box - This option allows you to place a special area for text that you want to draw attention to; create pull quotes, sidebars, or banners
- Quick Parts - Add more specialized components in the header, footer, margins, or body of the document; this includes Auto Text, Document Properties, Fields, and Building Blocks Organizer
- WordArt - Add animations to your text
- Drop Cap - Insert a giant first letter of the very first sentence on a page in the style of literature
- Signature Line - Add in a signature line for professional documents
- Date & Time - Insert the current date or time
- Object - Insert images or visuals to enhance your document such as an Excel chart; you can also insert text from another file if you have created a text box -
Symbols - Insert specialized characters of text or numbers not on your keyboard:
- Equation - Create mathematical equations to support your text
- Symbol - Place specialized symbols within the text
8. The Layout Tab
The Layout tab governs the look of your Word 2016 document and how things like whitespace and text are arranged:
-
Page Setup - This section controls the orientation and spacing on the page:
- Margins - Adjust the size of the margins, header, and footer
- Orientation - Change the page between portrait (vertical) and landscape (horizontal) orientation
- Size - Adjust the physical size of the page to match the paper size you are using to print
- Columns - Determine how many columns you would like to insert as well as their orientation towards each margin
- Breaks - Determine how your text will continue to the next page
- Line Numbers - Insert numbers for every new line or paragraph you create
- Hyphenation - Choose to add automatic hyphenation for text when necessary - Paragraph - Control the indent orientation, as well as the line space before or after you, begin a new line of text
-
Arrange - If you have inserted images, graphs, charts, or other objects into your text body, this section controls them as well as how your text interacts with those objects:
- Position - Move and position inserted objects around the page; text will automatically wrap around the object for better readability
- Wrap Text - Choose how your text will wrap around an object, or cross over it
- Bring Forward - If you have multiple objects that are on top of one another, this option brings the selected object forward one layer, so it is covered up by fewer objects
- Send Backward - If you have multiple objects that are on top of one another, this option pushes the selected object backward one layer, so it is covered up by more objects
- Selection Pane - This option allows you to view all of the objects on the page so you can easily see and select them
- Align - This option allows you to move objects so that they align with the margins or other objects on the page
- Group - Select a set of objects and group them together to be moved as a single unit
- Rotate - Rotate or flip objects
9. The Review Tab
The Review tab in Word 2016 provides tools for editing and sharing edits with others with access to the document:
- Proofing - This section provides you with quintessential editing tools that include a Spelling & Grammar Checker, Thesaurus, and a Word Count tool that also counts pages, lines, and paragraphs
- Accessibility - A more advanced tool, this option checks your document for readability and how difficult someone with a disability might have to comprehend your text
-
Language - Change your current language options:
- Translate - Convert selected text into another language
- Language - Define the language your editing tools such as Spelling & Grammar will consult when proofing your document - Comments - Organize your comments using this section; you can create a new comment, delete a comment, quickly navigate through previous or next comments, and toggle whether or not comments are visible
- Tracking - When editing a document that will be reviewed by others, it is helpful to visually track what you changed as well as seeing what others have changed. In this section, you can toggle Track Changes on or off, determine what changes will be shown, and activate a sidebar that shows all of your changes separately.
- Changes - When cycling through tracked changes by others, Changes allows you to accept the selected change, reject it, and move through the listed changes
- Compare - Select this option to compare the current document to another; you can also combine all changes made by anyone with access to the document into a single list
- Protect - If you are the owner of the document, you can either block others from accessing the document or restrict editing privileges, so your document remains intact
10. Print a Document
When you are finally happy with your document, you may want to print a physical copy to have on file or to give to someone else. To print your document from Word 2016, select File in the top left of the screen and the select Print in the column of option on the left. Printing has a few options to consider before finalization:

1. Print - Select this button when you are ready to print the document
2. Copies - Determine how many copies of the document you would like to print
3. Printer - This menu shows the current printer device your computer is connected to for printing the document; if you do not see your desired printer displayed, click the drop-down menu to find your device’s name or perform a search for it
For more advanced printer options, select Printer Properties underneath Printer
4. Print Pages - Choose to print the whole document or individual parts of it
5. Print One or Two Sided - Choose whether to print on one side of the page or both sides
6. Collated - Choose whether different pages of copies print in order, or each page at a time; this option is primarily for printing multiple copies of the same document
7. Orientation - Choose whether the document will print in a Portrait or Landscape layout
8. Paper Size - Choose the paper size you will be printing your document on in the printer
9. Margins - Determine the size of the margins on the paper copy of the document
10. Page Per Sheet - Choose how many of the in-document pages will appear on an individual piece of paper
You now have enough beginning knowledge for Word 2016 to create a great looking document for work, school, or presentations. If you have any further questions about learning the basics of using Word 2016, feel free to contact us at (800) 318-1439 or support@mychoicesoftware.com.


